If you're a Firefox user, you can also use the CustomizeFirefox extension that among other things, "anonymizes" you when you use Google so that your searches can't be tracked. Finally, think carefully before turning on Google's Search History feature. Search History lets you revisit all your searches and shows what you've searched for every day. When you use Search History, Google stores a record of all your searches on its servers. If you're worried that that search history may fall into the wrong hands, or be subpoenaed by the government, simply don't use the service.
If you are like me who uses Google extensively as your search engine, you are particularly vulnerable because Google will have a record of all your searches. This is made worse if your Google accounts are link. E.g. Blogger, AdSense, Gmail, Analytics etc. Even if you don't log into Google, it can track your searches because it uses cookies to track from session to session.
The simple was is to delete all your cookies before and after you visit Google. But that's problematic because cookies can be quite useful - they can log you into some sites automatically or remember your site preferences.
Source: Computerworld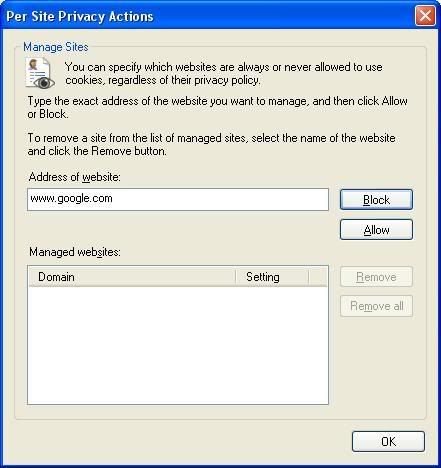 A simpler solution is to block only Google from placing cookies on your PC. How you do it varies from browser to browser. In Internet Explorer 7, for example, choose Tools–>Internet Options, click the Privacy tab, then click the Sites button. In the "Address of Web site" box, type in www.google.com, and click Block. From now on, when you visit Google, it won't be allowed to place a cookie on your hard disk, and it won't be able to track your searches. In Firefox 2, select Tools–>Options, select the Privacy tab, and click Exceptions. Then type www.google.com into the "Address of Web site" box and click Block. If you use another search engine, by the way, you can use this same technique to keep its cookies off your hard disk as well.
(Click image to see larger view)
Note that because Google won't be placing cookies on your hard disk, you may not be able to use various Google services, such as Gmail.
Google has numerous services you can sign up for, including RSS readers called Google Reader and Google Groups, which let you read newsgroups and other discussion groups. The more Google services like this that you sign up for, the more information Google knows about you. In addition to your searches, it will know what blogs and newsgroups you read, for example. This makes it that much easier for the search giant to create a profile about you. So either don't sign up for those services or else create separate Google accounts for each of them, so that the search engine can't correlate all your interests.
Sunday, May 27, 2007
Keep Yourself Safe From Google
Adding AdSense Ads in your New Blogger blog post
Base on the 'heat map' in my previous post, I have added Google Ads into my first two blog post. I've added only one ad unit as I don't want my blog to appear too cluttered and untidy. Another advantage of adding Ads into individual blog post is that the Ads seems more relevant, thus increasing your chances of a CTR. Here are some tips for where in the XML Template you should paste the parsed HTML code. Blogcrowds used a barebone Minima template so it should be similar in all templates. Find the normal text and then add the bolded code are added by me: 1)Next To The Post <div style="float:left;"> <div class='post-body'> 2)After Post Before Credits <div class='post-body'> <div><!--parsed Adsense code--></div> <div class='post-footer'> 3)After Credits <p class='post-footer-line post-footer-line-3'/> <div><!--parsed Adsense code--></div>
If you are worried about violating AdSense Terms Of Service (TOS). Stavanger from blogcrowd wrote to AdSense Help Center, and received some vague replies that seem to indicate that slight modification of the code for the New Blogger is OK. Here is the email he received:
"Hi,
You are permitted to make minor edits in Blogger Beta. However, please keep in mind that in general publishers are not allowed to alter the AdSense ad code for any reason. Once you've generated the ad code in your AdSense account pages, you may not alter any portion of the code or manually change the layout of the ads.
Thanks for your understanding.
Sincerely,
The Google AdSense Team"
Read more about it here.
This is how it is done. You generate the AdSense script from AdSense site, then replace HTML characters like < with < etc.
<!--parsed Adsense code-->
</div>
<p><data:post.body/></p>
<div style='clear: both;'/> <!-- clear for photos floats -->
</div>
<p><data:post.body/></p>
<div style='clear: both;'/> <!-- clear for photos floats -->
</div>
<p class='post-footer-line post-footer-line-1'>
<span class='post-author'>
<b:if cond='data:top.showAuthor'>
<data:top.authorLabel/> <data:post.author/>
</div>
</div>
</b:includable>
</b:widget>
</b:section>
You can read more about it at Google AdSense In Blogger Beta XML Update.
You can actually parse the script in Notepad using Replace All or a HTML text editor like Dreamweaver. For those without any HTML editor, Stavanger has even made it convenient for you by giving a parser at Parse Google AdSense For XML Blogger.
Posted by Derek at 12:45 AM
Labels: AdSense, Blogger Hack